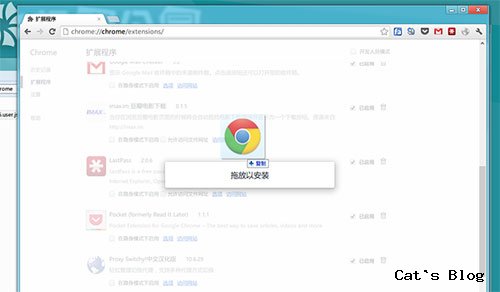
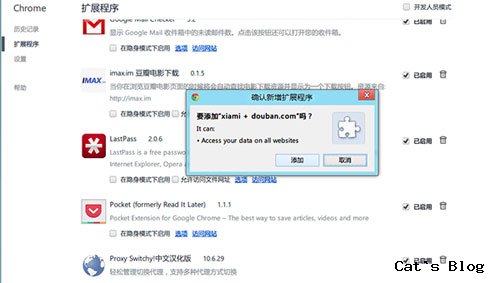
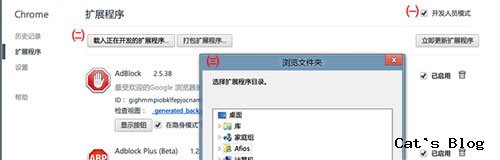
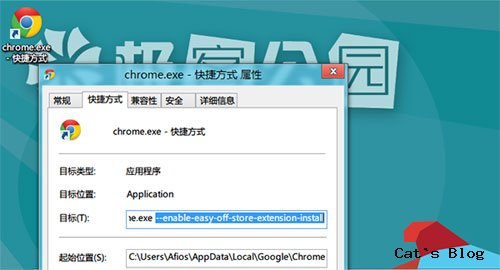
近日 Google 的 Chrome 浏览器宣布从最新的 Chrome 21.x 以及更高的 Chrmoe 22.x 版本开始默认只允许从 Chrome Web Store 下载安装扩展程序, 而众多未登陆 Web Store 的无论是扩展插件还是应用程序抑或 Greasemonkey 等 JS 脚本都被排除在外。
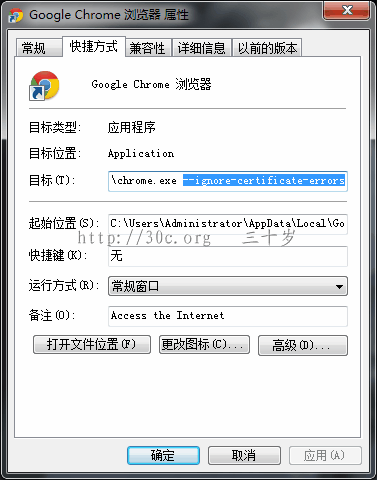
当然,按照官方给出的解释是处于安全考虑,而刚好最近被爆出的 Chrome Web Store 中的 Proxy Switchy Plus 汉化版等存在流氓行为也表明这项举措也无可厚非,但毕竟还是给很多使用 Greasemonkey 或 Stylish 脚本的用户造成了很大的不便,那么现在应当如何在谷歌浏览器安装 Web Store 外的第三方扩展程序呢?下面有两个方法。
8. Chrome 的 user agent 自定义功能可以伪装成其他浏览器。如果网速非常慢,伪装成智能手机会有明显改观:很多网站提供了轻量级的移动版界面。要自定义 user agent 字符串,可以打开开发工具(Windows/Linux 下:Ctrl+Shift+I,Mac 下:Command-Option-I),点击窗口底部的“设置”按钮,点选“user agent”下的“更改 user agent”,在下拉框中选择“Android 4.0.2 – Google Nexus”或“iPhone – iOS 5.0”,并取消选中“更改设备参数”。
9. 如果你正在使用的 DNS 服务器非常慢,改用 Google Public DNS 便成为加快浏览速度简单有效的方法。Google 解释说,“DNS 协议是网络基础架构极其重要的一环,它为互联网提供电话簿服务:计算机在访问网站时需要执行 DNS 查询。复杂页面在开始加载前需要执行多次 DNS 查询。计算机每天可能会执行上千次查询。”
如果 Chrome 和 Firefox 都不能满足需求,可以考虑选用为低速连接优化的浏览器 Opera 并打开 Opera Turbo 模式,该功能可以利用 Opera 的服务器压缩页面及页面内的资源。Opera 使用 Google 的 WebP 图像格式节约流量,同时能展现更优质的画面。Opera Turbo 的平均压缩率可达约 60%。Android、Symbian 及 Windows Mobile 平台的 Opera Mobile 应用也提供了 Turbo 模式,另外 Opera Mini 应用提供了更高的压缩率(高达 90%)。Opera Mini 支持大多数手机,包括纯功能手机和 iPhone。
这几天去XDA闲逛,发现Z大又回来了顺便还给我们带来了一个N大的惊喜。。。这个脚本可以增强WIFI的信号。。。其实我早就发现有这篇文章了,但是一开始没弄明白这个脚本是怎么运行的。。。用Z大给的命令iwconfig总是提示 file NOT FOUND,这让我很郁闷。。。后来才发现这个iwconfig系统不是自带的,需要下载Z大提供的那个文件才能运行。。。囧一个。。。
Hi, I noticed that our wifi driver can be controlled via iwconfig to increase TX power. It’s not too impressive change (from default 14dbm to max 15dbm), but still it’s a ~25% transmission power increase considering miliwatts (25mW->32mW)
Please remember it will slightly improve your wifi connection, but also increase the power consumption!
Google 好几天之前发布了Android4.0 也就是冰淇淋三明治(Ice Cream Sandwich 简称 ICS)!最近Z大回归了XDA,给我们带来了这个最初版本的ICS。。。
不多废话,ROM信息如下。。。
[KERNEL] 内核
– ol’ good 2.6.29-SEMC 官方的2.6.29内核
– fixed touchscreen driver (now backward-compatibile with Gingerbread) 修复了触摸驱动
[ROM]
– partially based on drewis release (thanks!) – currently I don’t have access to PC that could handle compilation of the whole thing 一个致谢的话 不解释。。。
If someone could compile clean es209ra build and upload it would be awesome.
[WORKING] 可用的
– it boots 能启动(偷笑。。。)
– radio, calls, txt (sms) 信号 电话 短信
– audio partially working (in-call is fine, playing mp3/ringtones leads to WLOD) 可以打电话,但是铃声响起或者播放MP3会导致WLOD。。。(White LED of death,就是白色LED灯然后死机。。。)
– bluetooth, GPS seem to work 蓝牙 GPS 貌似可以用。。。
– wifi almost working (“can’t find wlan0 device”) WIFI 几乎可以用了。。。(也就是还不能用。。。)
– mobile data (it gets IP but disconects afterwards, needs investiagtion) 移动网络可用。。。(能得到IP地址但是会自动断开连接。。。)
[NOT WORKING] 不能用的。。。
– most of the stuff does not work 几乎没什么能用的。。。
– quite unstable 不很适合日常使用。。。
*Miui 1.11.4 added .
*Font changes ( reboot required )
*Superuser & su binary updated.
*New Bootanimation ( Thanks raac for helping me out )
*bugs are fixed .
*etc etc
#MIUI 1.10.28 pRiMe 001
*Added support for the Given Kernel
*Media Scanner working properly ( with the new kernel )
*Wifi tether works ( Access control should be disabled in FXP kernel )
*Google music 4 added .
*Few tweaks
*Sleek Metro look
#MIUI 1.10.28 pRiMe
*Miui 1.10.28 added .
*Android 2.3.7 as base .
*Super User Changed ( No Annoying ” Root On/Off ” )
*Wifi tether added ( fully working )
*Overall performance improved with the new Miui Version.
*No data Bug .
*Wifi fully working .
*Usb Tethering .
*NOfrills & Cpu spy Included
*Resan Media Included
#MIUI 1.10.24 Prime
*Miui 1.10.24 added .
*Android 2.3.7 as base .
*New camera records 2H max .
*Wifi tether added ( fully working )
*Overall performance improved with the new Miui Version.
*Gallery optimized .
*No data Bug . No No Noooooooo.
*Wifi fully working .
*Usb Tethering and much more.
*ohh .. yeah .. yeah .. a new theme . lol .
#MIUI 1.10.14 Basic Hotfix V 2
*Offline Charging Fixed ( Thanks Cobrato for pointing out the issue )
*Link2SD patch included ( See 2nd post for more info )
*Minor Theme changes ( Text & Dialer )
*Prop edited ( Now device recognized properly )
#MIUI 1.10.14 Basic Hotfix V 001
*All Lags gone .
*Boot time improved a lot ( plz update to Bootmanager 1.3 )
*Some tweaks added
* Miui 1.10.8 Added
* Junk apps removed
* Hi res Graphics Optimized ( Launcher )
* Dual Touch Fixed
* Camera Working
* Video Camera Working ( 720P / High / Low )
* Root Permission Fixed ( No SU issues )
* CRT Animation Working
* Lockscreen Torch Working ( requires Luke kernel provided)










9 月 2 2012
单IPVPS配置多个SSL站点
本文共被喵星人侦察过12,999次。。。最近在VPS上已经搭建了一个自用的Glype,为了避免被淦我就配置了一个StarSSL,用HTTPS访问。最近闲着没事儿我又想给我的iLazyCat.com的一个子域名也配置一个SSL,但是弄的时候却发现,貌似不能配置两个SSL证书,无论怎么配置都只有一个证书,分别访问两个域名总有一个提示域名不匹配,喵了个咪的~这就达不到我想要的效果了。。。Google一番才发现,SSL证书貌似只支持一个IP地址绑定一个证书,不能在同一个IP地址上面给不同的域名分别配置SSL证书。。。除非去购买多域名专用的证书。。。不过我查了下,多域名的证书都贵的要死要活的,低成本才是我的目标~
于是乎,经过另外一番Google,终于发现了这个在单一IP地址上面可以配置多个域名SSL证书的方法,嘻嘻。。。
首先科普。。。
正因为如此,我们便不能在一个IP地址上配置不同的SSL证书。。。
但是真的只能这样了么?OH当然不是。。。Apache从2.2.12之后就开始支持SNI了。。。如果你的Apache版本在2.2.12以下的话,就去更新一下吧。更新完了我们继续~关于SNI的信息可以到这里找到。。。
确认Apache版本在2.2.12以上之后,就可以开始配置多个SSL证书了。
首先修改Apache的配置,开启SNI和分域名分配主目录。。。阅读全文。。。
By Lazy Cat • 教程 2 • Tags: Apache, DIY, HTTPS, SSL, VPS, 懒猫, 教程